How to photograph jewelry for e-commerce?
How to photograph jewelry for e-commerce and how to organize an ecommerce photoshoot? Photographing jewelry for your online store can be a challenge if you don’t ask the right questions at the start. How do you produce both high quality results and a uniform display of your jewelry designs?
Be prepared to deal with the unique properties of the materials
An item of jewelry is typically made up of multiple elements and materials. Each of these responds differently to light. It can be difficult to photograph something like an emerald mounted on a vermeil ring. If you want to showcase the size of the stone, manage light scatter inside the gem, and illuminate the band at the same time, youl first need to understand how each of the different materials responds to light. One piece of advice: experiment! Run tests where you vary the light intensity to photograph different items of jewelry and gemstones. You’ll soon get the hang of it by comparing the different results.
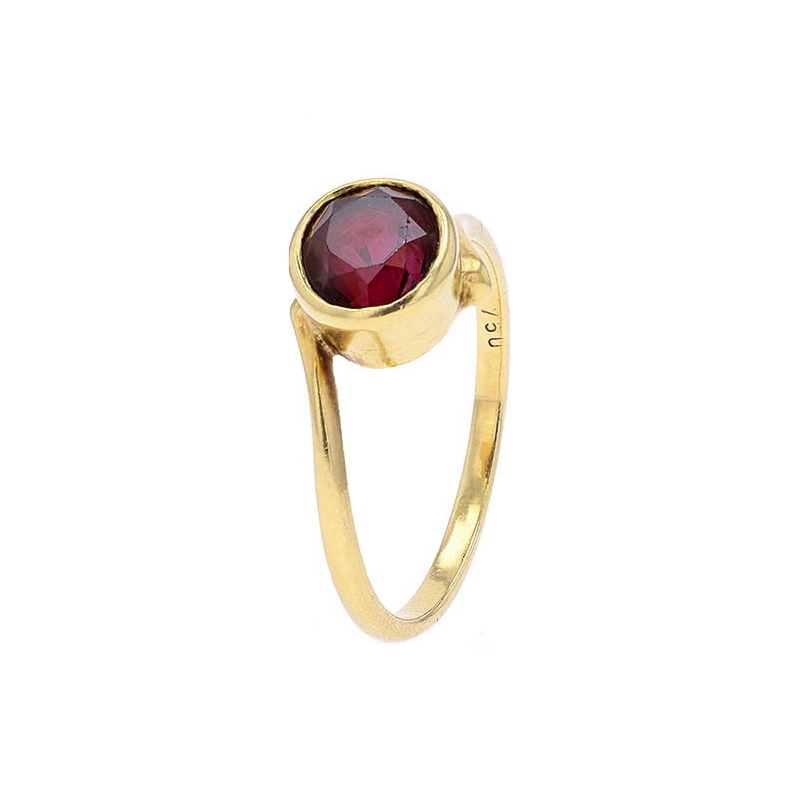
Properly adjusted lighting will highlight the size of your stones. See before / after shots of the same item of jewelry.
How to photograph jewellery? Showcasing different items
For online retail, it’s important to put some thought into how you lay out the jewelry in your shots. There are certain guidelines in the jewelry business that you need to follow if you want to show your products at their best. Also, for things like quality control, it’s important to have access to the right product photo equipment and settings. With an average quality camera or lens, it’s harder to capture fine details, like the inclusions in a gemstone or the wear of a ring, even with the best jewelry photo editor.

Be prepared!
How should I display my jewelry? The crucial steps to follow
For online retail, shoot items in flatlay.
- Try not to show only close-up photos of your jewelry. It’s crucial to have at least one flatlay (horizontal) view of each item as a whole! This type of shot gives a clear view to anyone who wants to look over the item. Also, if you display the same types of photos side by side for all of the different items you have on sale, it’s easier for customers to navigate through the different chain lengths, gemstones and other options available in your store.

Some items of jewelry, like rings, may need to be displayed on a stand to ensure beautiful jewelry photos. Alternatively they might need to be positioned in a particular way so they can be lit and photographed well. Your goal is to highlight specific details of the items, like the inner surface of a ring, the shape of the head, or the culet of a gemstone. When you display them vertically, you can easily illuminate each facet of your gems. This lets you control the fire and color of the stones.
Be creative when positioning items of jewelry to create compelling images
To hold a ring in a vertical position, I recommend using just a dot of glue from a glue gun. It won’t affect the band, it’s easy to remove, it’s transparent (so it doesn’t create color reflections that would interfere with the shot) and it’s highly resistant to the weight of a small piece of jewelry. You’ll need to use a photo editing software to erase the glue from the final image. If you’re allergic to photoshop (or any other jewellery photo editor), you can simply position the ring on its side to create a simple, helpful shot of a piece of jewelry.

It can be quite a challenge to lay out an earring so you can photograph it in a horizontal position. The problem? Earring backs! Whether they’re hooks, screw backs, lever backs, push backs, or something else altogether, they can be a big hassle when you’re trying to place an earring the right way and require a lot of repositioning. As a general rule, when you’re shooting earrings horizontally and you don’t want the backing to get in the way, but you also don’t want to retouch the final image, the best solution is to simply punch the back of the earring through a piece of white card. The back will be out of the way and will no longer interfere with positioning the earring, even if you’re shooting something like a hoop earring. Placing the earring in a flat position is the simplest solution.

For flat shots of earrings, a simple trick is to punch the back of the earring through a piece of white card
It’s a good idea to use a pen, Q-tip or fine needle to handle your jewelry with care rather than directly handling it with your fingers, which may not be as precise. To avoid leaving any smudges, always use gloves when placing and arranging your jewelry. Otherwise there’s a good chance that your fingerprints will show up in the final image! There’s nothing better than soap and water to clean jewelry made from oxidation-resistant materials. You can use a leather chamois for anything else, and above all a Duster Spray (essential!!) to remove dust and fine particles.
How to photograph jewelry for my online store?
3 to 4 photos are largely sufficient for each item of jewelry. For a necklace, for instance:
- One flat view (flatlay) to show the item as a whole,
- Two shots to show detail: the stone, bail, chain or clasp,
- One photo of the item on a mannequin or model, always a good idea because it helps potential customers imagine the item in context.
In conclusion when you ask how to photograph jewelry, try to go for simple, effective images, using the same number of images and the same positioning for each item within a range so that you create a clear, uniform, intuitive display.
Once you’ve resolved these issues, you can move on to shooting photos of your jewelry.
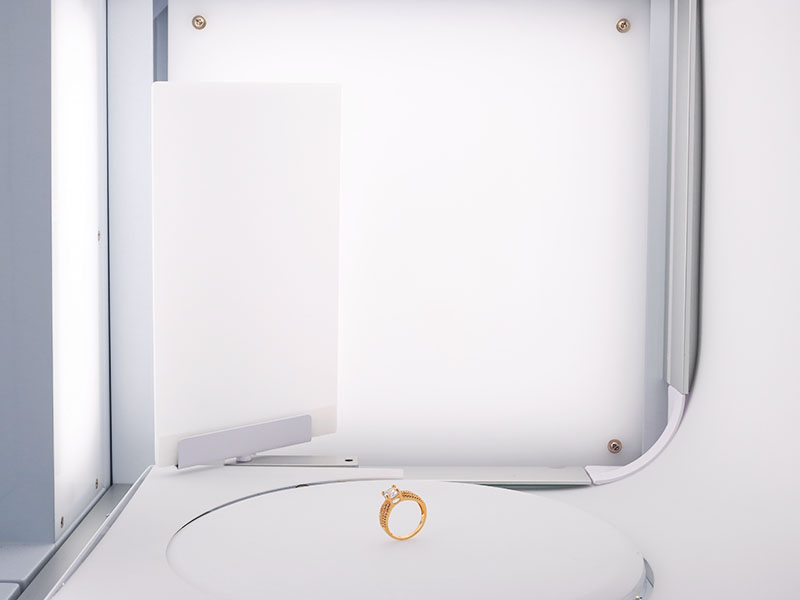
A photo studio equipped with a LED lighting system is well suited to packshots
Should I use natural lighting or flash?
How to photograph jewelry? Tools for photographers and some jewelry background ideas
Useful info: what’s the difference between a packshot and a still life?
- Still life = photo of a product as staged in a scene.
- Packshot = simple photo of a product on a white background, generally used for e-commerce and product catalogues.
Natural light:
Natural light is best for still life images, whereas it’s far preferable to use flash lighting or very bright LED environments (full LED lightboxes) for jewelry photography. Whatever you do, don’t do your packshots in continuous light with “redhead”-style lights! If you don’t have access to flash lighting or an LED lightbox, get creative and try to always use a uniform background or the same color backdrop. You can also read our article about macrophotography to check out a few examples of home-made lightboxes.
Additionally, you should adapt your lighting setup to suit your deadlines and the number of products you have to photograph. The perfect is the enemy of the good. Take your productivity into account as well as the quality of your images and try to find the right balance!
Flash lighting and full LED light box for photographing jewelry:
These are very well suited to photographing jewelry. Not all materials respond to light the same way. For instance, gold reflects light while leather absorbs it, meaning that one will require more light than the other. Using flash is a simple way to control the intensity of your lighting.
Photographing diamonds:
For some stones, like diamonds, you can position small directional LED flashes to highlight every facet of the stone. Diamonds are difficult to photograph because they’re transparent and light tends to be reflected inside the stone, creating noticeable light scatter. The way stones are cut can also make them difficult to photograph. Pavé set diamonds tend to merge together if the light isn’t well managed. This is another reason why it’s important to highlight each of the gems with directional lighting.

Diamonds are difficult to photograph because of light scatter.
Unlike natural light, which is changing and can’t easily be controlled, flash lighting and a full LED lightbox will let you keep the same light density for the backdrop of all your photographs.
For packshot photographs, it’s important to present your items of jewelry on a pure white background (100% white), so that you always keep the same background and produce a uniform display. If you want to, you can then edit the background in post-production to create black background images, to add a very subtle bokeh background or any other type of effect, but always shoot with a white background first and foremost.
How to photograph jewelry for e-commerce? Tips:
To help control light reflections on metal or gemstones, you can equip yourself with small sheets of black and white card paper to attenuate or accentuate the light. By using these sheets of card paper, you can also reshape reflections on an item of jewelry to give them a more uniform appearance.
Which photo equipment should I use?
The quality of your photographs mostly depends on the type of camera and lens that you use. For instance, if you’re using a low-end lens on a 50 mp Canon 5DsR, you’ll only get so-so results. You have to find the balance between your budget and what’s available on the market. However, as a general rule: the best choices are a reflex camera and a fixed lens. Fixed focal length lenses are much more sensitive to light and will always give you better quality results than a zoom lens.
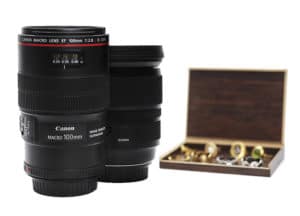
When shooting ecommerce jewelry, the lens is as important, or even more important than the camera
Macro lenses are a firm favorite when it comes to shooting small items like a ring, gemstone or brooch.
In conclusion, photographing items of jewelry might be a bit of a challenge when you’re doing it for the first time, but when you take it step by step, you’ll quickly gain confidence and expertise. So, just one more piece of advice: take lots and lots of test photos!
Learn more about our dedicated product photography offerings for the jewelry business
Discover the accessories for 360° jewellery photography
Become the photographer of your products
Other posts you might be interested in :

How to avoid blurry product still photographs
When you create product still photographs, a number of problems with your camera settings can cause blurring. Blur can also be caused by a stabilizing issue or inaccurate adjustments. How do you solve the problem, and which macrophotography techniques can you use to obtain perfectly sharp results with flawless acutance?

Photographing small objects for online store : tips & tricks
Macrophotography or small objects photography for online store is a valuable tool to showcase certain types of products such as jewelry, timepieces, components and eyewear. Whether for e-commerce, quality control, or internal use, it’s important to create a positive image of your pieces. For this you need the right materials and the right working environment! […]

What is Ocarat’s secret to showcase realistic jewelry photography?
Ocarat.com has revolutionized the online jewelry market in France. The online jewelry is using PackshotCreator automated photo studios.