How to create face-up views of diamonds with PackshotMacro DIS?
You have now learned how to create 360° views of loose diamonds that display brilliance, fire and sparkle. In this tutorial, we will show an alternative way of showcasing these beautiful and exclusive aspects. Discover all the steps for creating face-up views of diamonds.
Supply
Tool
Duration
-
1. Loose Diamond Kit supplies
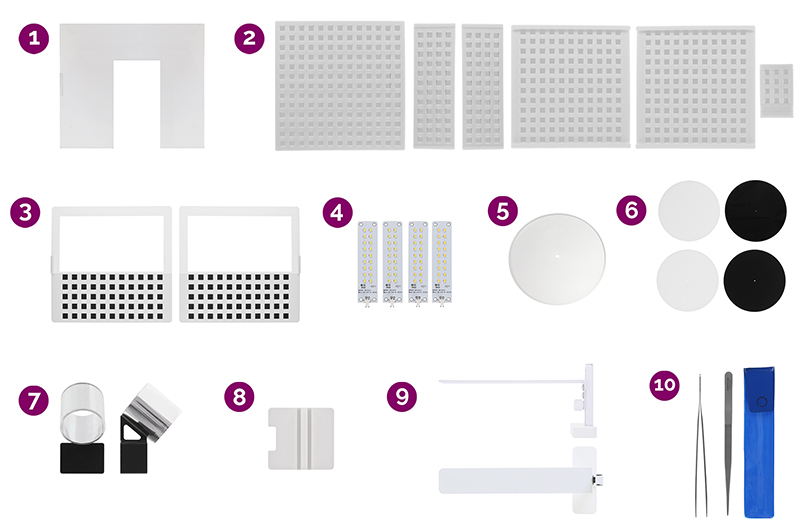
To create face-up brilliance, fire and sparkle views, you will need the following supplies from your Loose Diamond Kit, available with the PackshotMacro DIS:
1- Acrylic panel
2- 6 mirror matrixes (1 for back light panel, 2 for front doors, 2 for side doors, and 1 for front center)
3-2 black squares matrixes (to cover the bottom of the side doors mirror matrixes)
4- 4 sparkle light panels
5- Metal turntable
6- 4 turntable plates (2 black and 2 white with different diameter centering holes)
7- Lens loop
8- Loop platform
9- Hood
10- Tweezers
-
2. First step
In order to create a face-up brilliance, fire, or sparkle view:
For studio configuration, diamond’s placement, camera positioning and diamond focusing areas, please follow the instructions from the 360° brilliance, fire, and sparkle views tutorials respectively.
-
3. Modify software settings

Now that your studio is set, camera positioned and diamond placed and focused, set up a quickshot capturing mode. On the software, press the “options” button and then go to “workflows” and select the “apply QuickShot mode”.
Go back to the capturing interface and select 360 as the capture mode.
-
4. Configure your camera parameters

Under “Camera Settings”, click on the “picture style” button and set up the saturation to 7. Then, choose an aperture value between 13 and 16 for a sharp face-up view. Leave the ISO value as low as possible and adjust the shutter speed for brightness.
Note: These camera settings can be used to create any of the three views (face-up brilliance, fire and sparkle).
-
5. Adapt your lighting

For face-up brilliance and fire view:
- Turn off all lights in the studios, leaving only the toplight at 100%
For face-up sparkle view:
- Set the toplight to a value between 1 to 10% and the front sparkles to 100%. All other light sources should be turn turn off.
Important: Make sure all the doors from the studio are closed. If possible, turn off the outside lights as well. Diamonds are very sensitive to outdoor lighting.
Tips: Move the lens loop around to increase the lighting and to produce consistent and defined cuts and arrows.
-
6. Define face-up view settings

Now, for the last step, change the spin range under “Animation Settings” to “tilt”. Select the numbers of images desired to create your face-up view. We advice choosing 90 images or more.
- For face-up brilliance and fire view, you are all set. Simply press “snap” to begin creating the view.
- For face-up sparkle view, first click on the “turntable controls” toggle. Then enter 512 and press play to tilt the turntable to its initial starting position. Now you can create your view by clicking on “snap”.
-
7. Personalize your diamond face-up view

Your face-up brilliance, fire and sparkle are done and ready to be saved in HTML5 format. Learn how to personalize them with zoom, play/pause buttons, hyperlinks and others.


