How to change the color of a product?
Supply
Tool
Duration
-
1. Selecting your file
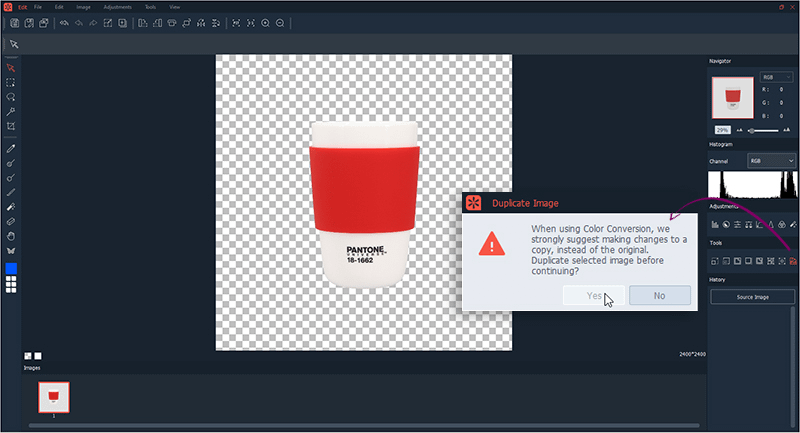
Select the product photo that you would like to change the color and click on the “Edit“ button. Your photo will automatically open onto the editing interface.
Under “Tools”, select the “Color Conversion” feature. You will be asked if you would like to make a duplicate copy of the original file. For many reasons, it is strongly suggested to create a duplicate. To do this, click on “Yes”.
-
2. Choosing the color space and grids
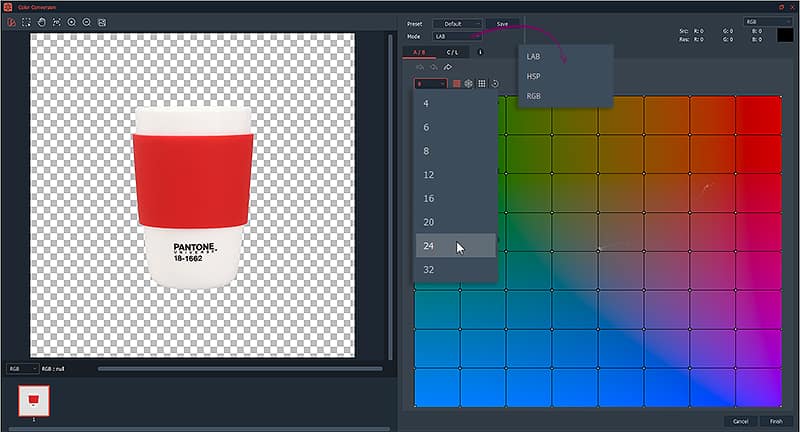
Now, on the right side is where the original colors are converted to a new color. The small clouds white dots highlighted represent the colors in the image. Specific squares in the grid or the entire grid can be moved to shift the colors.
For the first step, under “Mode”, choose which color space you would like to work with (LAB, HSP or RBG). Then select 24 as the number of squares on the grid.
Tips: The more squares, the more control you will have over selecting and manipulating specific colors.
Note: The center square is where pure white is located.
-
3. Selecting the conversion methods

There are two conversion methods available: A / B and C / L. First choose the A / B method, then select the “Pin All”. This allows each square to stay in one place while you can select only the squares you want to move. Just like adding squares, pinning offers more color control.
-
4. Changing the product's color
Now, on the left side of the screen click on the “Select” button. Then, select and drag from your product’s photo, only the color that you would like to change. Make sure that all color values (lights and darks) are selected. You will notice that the squares that represent the selected color will automatically be pinned. If you would like to pin more squares, press CTRL or CMD on your keyboard and simply select the desire squares.
Next, click in one of these pinned squares and move them around to the desire color.
Tips: If you made a mistake or would like to go back one step or start over, you can click on the “Undo” or “Undo All” buttons (picture below).

-
5. Creating more products colors
After changing to the desire color, click on the “Copy Original” to add more photos. You can then repeat the same process of moving the squares to another color and copying the original until you have all colors needed.
Once done, click “Finish” and save your photos.
Note: If you would like to change the contrast and saturation of the colors, click on the C / L conversion method. Then, repeat the same process from step 7 to 9.
-
6. Adjusting the color contrast

If you would like to change the contrast and saturation of the colors, click on the C / L conversion method.
Then, repeat the same process from step 7 to 9.


