How to create 360° animation of shoes on transparent background with PackshotCreator R3 M Mark II?
Supply
Tool
Duration
-
1. Clean, place and center you shoes
Before placing in the studio, make sure your shoes are properly cleaned. Use a cloth or a brush to gently remove debris or dust. Depending on your shoe’s materials, you will need a padding fabric or paper, straightening rods or dusting spray.
When cleaned:
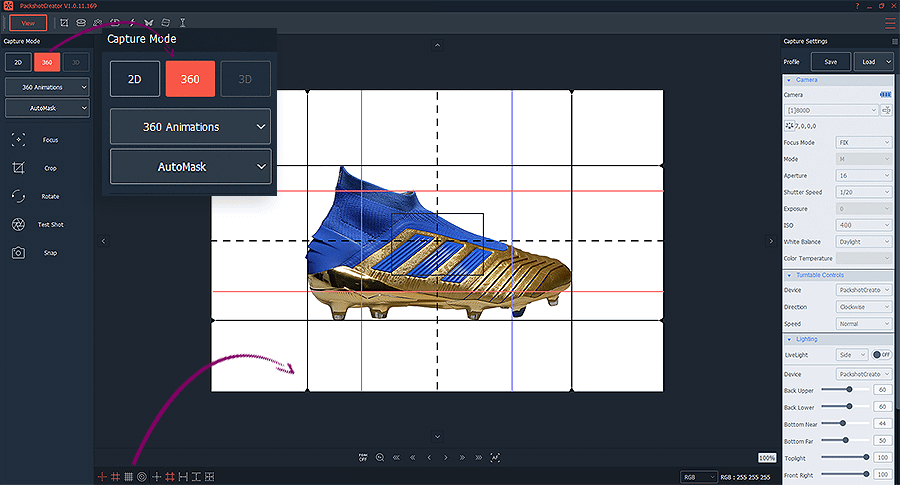
- Select the 360 button and then choose AutoMask as the shooting mode
- Place your shoe by using the centering marks on the studio and the positioning rulers on the software (crosses, lines, grids, etc.).
- When it is correctly positioned, you can save a ghost image by clicking on the AfterImage tool and then selecting add an afterImage.
-
2. Adjusting camera and lighting settings

Under camera settings, set the ISO to a value between 200 and 400 and the aperture value to 16 for a complete sharp 360° shoes animation. Then, adjust the shutter speed for brightness.
This studio has 7 dimmable LED light sources including: back upper & lower, front, top, bottom near & far and sides. You can adjust each source from 1 to 100%. When you get the desired result, save the settings for future uses.
Note: For the AutoMask to work perfectly, the lighting needs to be adjusted in order to create a contrast between the background and the shoes edges.
-
3. Animation settings

Choose the spin range, shooting mode and the number of images you want to use to create your 360° shoes animation. You can select from 1 up to 1024 images. However, for an e-commerce website, 24 pictures are enough to get a good ratio between fluidity of the rotation and animation weight.
-
4. AutoMask settings
The software offers 4 different presets to be used according to your products typology. Select between matte, reflective, translucent or glass. First, select new profile and then the feature that will best fit to your product, then press snap. For this tutorial, we used the reflective preset.
PackshotCreator advantage: natural shadow
Orbitvu Station software gives you the advantage to keep a natural shadow on your product’s photos when removing its background. To do so, under AutoMask settings, select apply shadow before pressing snap.
-
5. Adjustings the transparent mask

In this step, adjust the transparent mask of your 360° shoes animation. With the left and right cursors, adjust the opacity and quality of the mask until you get a perfect black shoe shape. If you need to re-adjust the lighting, you can do by clicking Retake. When satisfied, click next and save the
AutoMask profile for future uses.
Tips: The black mask is what will be kept on the picture and the white is what is going to be removed.
-
6. Creating your 360° shoes animation on transparent background

You’re all set! Now the software automatically controls the turntable to produce a full 360° rotation while the camera shoots your shoes on a transparent background.
If you would like to add colors or a lifestyle background to your 360° shoes animation, click on edit when the 24 pictures are done being taken.
-
7. Choosing a background

The 24 images will be automatically opened on the editing interface. Under tools, choose the add a background feature.
For lifestyle photos:
- Click on image and then browse to search for the image you would like to add.
For pure white or colors:
- Click on colors and select the color of your choice from the color library or enter a RGB or CMYK code.
Next, click apply all and then save.
-
8. Save your file
Click on “next” to save your animation. You can make your 360° shoes animations interactive by adding play/pause, full screen and zoom buttons. Discover our tutorial on how to set the perfect HTML profile for a 24 pictures animation?.


