The Complete Guide to Packshot Photography, 5: How to Ensure Consistency Between Photos
Welcome to the 5th and final article in our series The Complete Guide to Packshot Photography. Today, we’re tackling a crucial point for any company wishing to stand out from its online competitors: the consistency and homogeneity of your packshot photos.
Indeed, ensuring consistency and homogeneity between each of your product photos over the long term will in turn give a high-quality impression of your products, as well as a much more professional brand image.
In this article, we’ll explain what you need to take into account in your photo shoots to ensure this consistency, and then present you with the various means at your disposal to facilitate this process.
And as the saying goes, the devil is in the detail!
Consistency and packshot photography
Why is consistency so important?
When it comes to selling products online, good presentation is essential to attracting customers and convincing them to buy – a point we’ve covered again and again throughout this series. In fact, it’s one of the most important principles of packshot photography when you have more than one product to present and sell.
If the photos are not consistent with each other, you can quickly lose credibility and damage your brand image. Worse still, it can really damage the buying experience and put off your users. Imagine, for example, that you’re looking to buy shoes online and you come across a website presenting these products in this way:
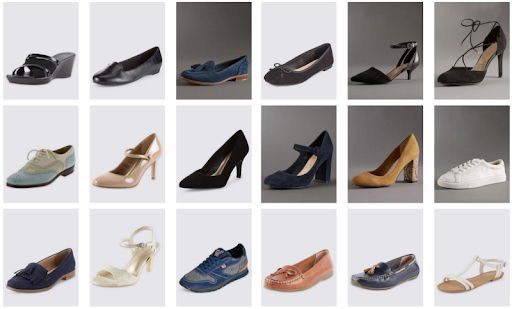
If every pair of shoes is presented with a different staging, non-homogeneous lighting and multi-colored backgrounds, you’re likely to find it hard to compare products and get a clear idea of what you’re buying. This may encourage you to look for products elsewhere, and rightly so. That’s why visual consistency is so important for creating a pleasant user experience and making it easier to compare products.
To guarantee this consistency, it’s important to ensure that every detail is identical from one photo shoot to the next, details such as:
- lighting,
- product position,
- camera settings,
- or background.
If one of these elements differs from one photo to the next, it can create an impression of confusion and inconsistency.
As you can see, to sell products effectively online, it’s essential to create a fluid, high-quality user experience. Having consistent photos for each product is a key element of this experience, making it easier to compare different products and creating a strong, identifiable brand image.
How do you ensure consistency between all your photos?
First of all, make sure that all photos are taken under the same lighting, focus and background conditions. This means you should use the same type of light, the same focal length, the same settings and the same background for each photo. If you’re working with a professional photographer, make sure they know exactly what you expect, and check their results during the shoot.
Then use retouching software to adjust the contrast, color and sharpness of each photo, while maintaining the natural look of the products photographed. This will ensure that all your packshot photos are uniform and look their best. Be careful, however, not to retouch the images too much, as this could mislead your customers.
Finally, use a template or grid to place all photographed products in exactly the same place in the frame. This will facilitate the cropping process and avoid any confusion between different products. We also refer you to the second article in this series, focusing on equipment and what you need to know, where we delved deeper into the need to make a precise plan for the placement of your lights and equipment, ensuring to always place them at exactly the same distances.
By following these few tips, you can more easily ensure consistency between your packshot photos on your e-commerce site. You’ll give your customers a consistent, professional image, making them want to buy your products with confidence.
There’s only one question left to ask, and it’s a big one: how are you going to take your packshot photos?
Which solution should you choose for your product photography needs?
Will you outsource your packshot photography to a service provider, set up a traditional photo studio on your premises and hire a freelancer, or invest in an automated photo studio?
Neither solution is necessarily better than the other. It all depends on how much time and money you want to devote to it: each of these solutions has its merits, but also its drawbacks. Let’s take a look.
Solution n°1: outsource your product photography
A first possible solution is to send your products to an external service provider specializing in product photography.
This method offers a number of interesting advantages. First of all, you don’t need to worry about buying expensive photo equipment or reserving space on your premises for the shoot. Everything is taken care of off-site. Nor do you need to have any in-depth knowledge of photography.
However, there are also significant disadvantages to consider. You’ll need to find a trusted provider, organize the logistics for shipping and collecting your products, and the back-and-forth process may take longer. You may also have less control over the final rendering of your photos, unless you clearly specify your expectations and requirements through a detailed specification for your service provider.
In any case, this solution may be an interesting option for companies new to packshot photography who need a fast, practical alternative for producing quality images of their products.
Solution n°2: set up a traditional photo studio and hire a freelancer
If you’re looking for a more personalized solution to photographing your products, you might consider setting up a traditional photo studio on your premises and hiring a freelance product photographer. While this may seem costly at first, it does have its advantages.

Firstly, having a photo studio on your premises gives you greater control over the shooting process. You can adjust lights and props to your liking, and keep a close eye on the shooting process. And since the products don’t leave your premises, the circuit is shorter and you can pick them up as soon as the photos are taken.
However, the initial cost can be high, as you’ll need to purchase all the necessary equipment and install it. This can cost a lot of time and money, especially if you’re not familiar with photography equipment. What’s more, a photo studio can take up a lot of space, which can be a challenge in smaller work environments. It can also be harder to ensure great consistency between all your product photos, as you’ll need to set up your studio in the exact same manner every time…
You’ll also need an experienced photographer to make the most of your brand-new photo studio… Hiring a freelance photographer may be an option, but it also means you’ll have to wait for them to become available, not to mention the additional costs. You’ll also need to do your research to find the most qualified and experienced photographer to ensure a flawless end result.
Setting up a traditional photo studio on your premises can therefore offer many advantages in terms of shooting and improved response times, but the investment in time and money will be greater.
Solution 3: Do it all in-house with an automated photo studio
The last possible solution is to use an in-house automated photo studio. Not only can this be quicker and more practical, it can also be more economical in the long term, even if it requires an initial investment.
Indeed, when you hire an external service provider to take photos of your products, or when you use an in-house photo studio with a freelancer, you have to take into account all the associated costs: travel expenses, studio rental costs, photographer’s fees, and so on. In addition, there is often a time limit imposed when you hire a service provider or freelancer, which means that all photos must be taken and edited within a certain timeframe.

However, if you have an automated photo studio in-house, you can take photos of your products at any time. And without having to pay extra. Whether it’s a photographer, an employee from your marketing department or a stock-based employee, anyone can use this type of automated studio without needing photography expertise. All you need is a short training course to know how to use the studio. And you can take photos of your products at your own pace to make sure they meet your expectations.
In short, you save time and money in the long run!
You can also enjoy greater flexibility and much greater control over your packshots, which in turn will also improve your productivity. What’s more, these machines take up far less space on your premises than a traditional photo studio.
So, even if this solution is more expensive at the outset, you stand to gain in the long run.
Why choose an Orbitvu automated photo studio to ensure consistency between your photos?
If you’re opting for an automated photo studio, we warmly recommend Orbitvu studios, which are state-of-the-art and specifically designed for packshot photography.

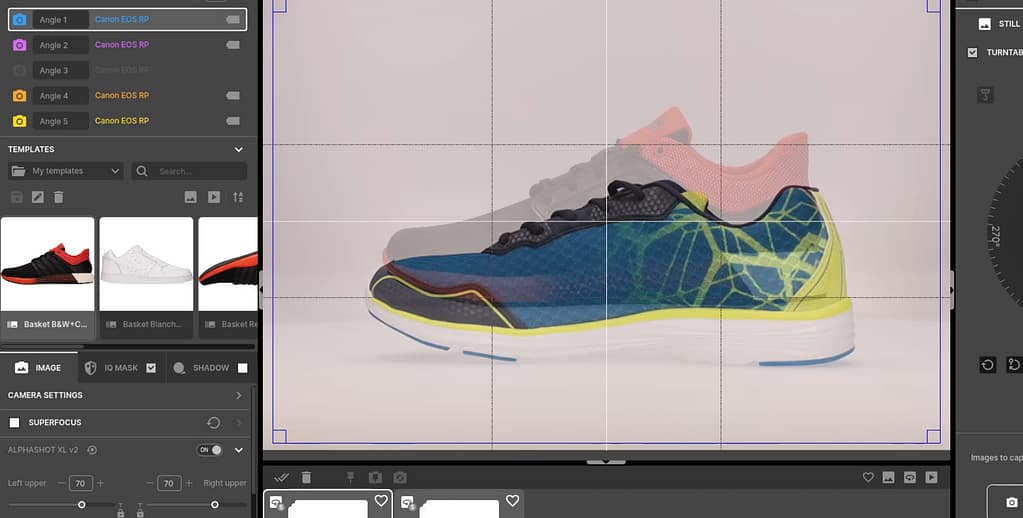
Orbitvu Station software allows you to set up and control the studio seamlessly. You can even save your settings as a profile. Use the ghosting feature for precise positioning of your products every time you shoot. This powerful software remains very intuitive to use! It will be a great help in ensuring consistency between all your photos.
Orbitvu’s automated studios also allow you to produce all types of media with ease: still photos, 360-degree animations, videos and more. Because the studio does everything for you, shooting is much faster and more efficient. This means you gain in productivity and quality.

You should also know that some studios are even designed specifically for certain types of products and their needs. In fact, we mentioned it in the third article in this series focusing on the best way to showcase your products. For example, the Fashion Studio and the Bike Studio are specific studios that have been developed, respectively, to meet the needs of fashion apparel and accessories, and bicycles.
In short, using an automated photo studio can be a particularly wise choice if you’re aiming for high-quality packshot photography… Especially if you’re looking for an all-in-one solution that’s easy to get to grips with. So why not consider Orbitvu studios for your business?
If you’d like to find out more about Orbitvu’s photo studios, please don’t hesitate to contact us. We’ll be delighted to answer your questions and help you make the right choice.

Become the photographer of your products
Other posts you might be interested in :
The Complete Guide to Packshot Photography, 5: How to Ensure Consistency Between Photos
Welcome to the 5th and final article in our series The Complete Guide to Packshot Photography. Today, we’re tackling a crucial point for any company wishing to stand out from its online competitors: the consistency and homogeneity of your packshot photos. Indeed, ensuring consistency and homogeneity between each of your product photos over the long […]

E-commerce product photography: 10 foolproof tips for creating a great-selling product photo!
Looking to boost sales on your website? Photos of your e-commerce products can make all the difference! In fact, a well-crafted photo can arouse the interest of your potential customers and encourage them to buy. But how do you create a photo that sells? In this article, we present our 10 foolproof tips for the […]

The Complete Guide to Packshot Photography, 4: Which Media to Choose
Welcome to the fourth article in our series The Complete Guide to Packshot Photography. Today, we’re going to be talking about media photography and more specifically which media to choose and why, a crucial issue to ensure you get the most impactful packshot possible. After all, some products need to be seen from every angle […]